Guitar Fretboard Crash Course
1. Standard Tuning
First, we'll start with the notes of the open strings in standard tuning. If you need to brush up on your standard tuning knowledge, here's a refresher:
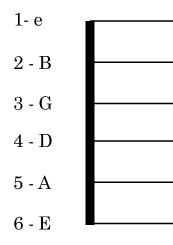
The strings are tuned in perfect fourhs (E-A-D-G), except there's a major thirrd going from the 3rd to the 2nd string (G - B). Then there's a perfect fourth again (B-e), making the 1st and 6th string both an E, two octaves apart.
- The highest sounding string is the 1st string (e)
- The lowest sounding string is the 6th string (E)
(You wouldn't believe how many students get this wrong, even after years of playing).
Why do we tune the guitar in this "standard" way that we do? TL;DR it's easier to play and switch from common chords to scales that way, while also minimizing hand movement. It's been around since the 1500s, back when the guitar's ancestors still had 4 or 5 strings. Fender has a nice little article about it.
2. The Horizontal
Next, we're going to use the major scale to move horizontally up the fretboard.
Why the major scale? Because it's the basis for everything in western music nowadays, which had its own evolution from the modes used in the Renaissance (but that's a whole other story).
First, a little refresher of the "formula" of the major scale: Whole step - Whole step - Half step - Whole step - Whole step - Whole step - Half step C - D - E - F - G - A - B - C Do - Re - Mi - Fa - Sol - La - Si - Do
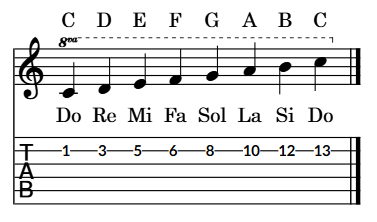
- A whole step = 2 frets on the fretboard
- A half step = 1 fret
Here's what that looks like on the 2nd string:

Next, we'll play the major scale horizontally across all six strings. You can flip through the strings below:

One thing we can note is that the major scale consists of two "tetrachords" (basically a four-note scale segment).
One starts on C, the other on G.
 Some may say this is "the key" to the major scale on the fretboard, because it's a symmetrical shape, but it creates a diagonal shape across the fretboard.
The guitar works with positions and diagonal shapes don't stay within one position. That's also why we're not going to be using a strict 3-note-per-string fingering as the basis of our practice, but a variant of it (but I'm getting ahead of myself).
It's more an interesting thing to notice than a real "hack" to unlock the fretboard.
Some may say this is "the key" to the major scale on the fretboard, because it's a symmetrical shape, but it creates a diagonal shape across the fretboard.
The guitar works with positions and diagonal shapes don't stay within one position. That's also why we're not going to be using a strict 3-note-per-string fingering as the basis of our practice, but a variant of it (but I'm getting ahead of myself).
It's more an interesting thing to notice than a real "hack" to unlock the fretboard.
3. The Vertical
If we filter out all of the C notes, we get these octave patterns:

Have a scroll through the different octave shapes below:

Your root is the most important note; it's your anchor. It's the relation between the root and all the other notes that will determine the resulting sonority; everything is in relation to the root (unless you're playing atonal 12-tone rows). The better you can find and see your root notes, the more freedom, command and insight you'll have over the fretboard.
4. Navigating The Matrix
Left, Down, Right
This little concept will make your thinking (and by extension your practicing) very organized and very clear.
After every root, we have 3 general directions in which the rest of the arpeggio/scale goes. We can continue “behind” the note (Left), “on” the note (Down) or “after” the note (Right). Every single possibility is contained within these 3 directions and once you have these core principles down, you’ll never get lost on the fretboard again.
3 Directions
Left
Down
Right
Let's see how that works if we cycle through the directions on the first three notes of the C major scale.
What we can observe here, is that either we have:
- 1 note on one string and 2 notes on the next;
- 2 notes on one string and 1 note on the next;
- 3 notes on one string.
Putting it together
Let’s now combine this with our octave patterns and play a C Major scale in different positions.
We’re not going to start at the very first possibility to play a C major scale on the neck, because that would involve using the open strings. For this first step I want you to see the fingering and with open strings it gets a little muddled. Not to worry though, they will be added back in later on.
Left
Let’s start in 5th position, meaning your index finger will be at the 5th fret. Your pinky will then be at the 8th fret. 8th fret, 6th string = C From there we’ll go into our first “category”; we’re going to continue behind the note.
Down
Next we’re going to shift to the 7th position, so that our index finger is on the 7th fret and our middle finger is on the C on the 8th fret. From here we’re going to complete the scale going straight down.
Right
And finally we’ll shift over one last time and we’ll have our index finger on the 8th fret, so we’re in 8th position. From here we continue after the note.
Have a look at the diagrams below:
This is what that looks like when we go from C to C per position. Notice the lighter green notes on the 2nd and 3rd strings. Because of the tuning of the strings, these notes are doubled. Hence the highlighted color.
As you can see, we end up with 7 positions. Here are a few other things we can conclude:
- The lowest possible root is either on the 5th, 6th or 4th string
- When the lowest possible root is on the 5th or 6th string, all three directions are possible (Left, Down, Right)
- When the lowest possible root is on the 4th string, the only possible direction is Right
- If we continue beyond the root notes, we end up with a 3-note-per-string fingering, but with a doubled note on the 2nd and 3rd string
Here's another carousel, with larger images and the full scales from top to bottom:
80/20
I personally spend a disproportionate amount of time practicing the major scale in these positions. In comparison, I barely practice the melodic minor, modes or any other "exotic" scale, as they're sometimes referred to. 80% of the outcome comes from 20% of all causes. This is the 20% I spend my time on that accounts for 80% of the outcome, when it comes to learning the fretboard. Get this down and then worry about tapping your way through double harmonic major.
The video below is a direct outcome from practicing the major scale with its different directions:
Case Study
And here's some from free improv over an E pedal.
Closing words
Practicing the fretboard can be daunting and overwhelming (I know it was for me). Developing this method and using it in my practice has made all the difference and I really feel that this is the most important thing I can give to others trying to study the fretboard. I really can't stand it if I see some video or article about "15 minutes to learn the fretboard". It takes years and it honestly never ends. It may have taken you 15 minutes to read this page, but I doubt you now actually know your fretboard.Also as a little sidenote, this whole thing comes down to playing in 7 positions and adhering strictly to those positions. This is for practicing purposes only. If you look at the Improv video, I obviously go all over the neck and don't stick to one position necessarily. After a while, everything chunks back together to create a new whole. Just putting it out there.